Provisioning
Provisioning of phones is phone independent, meaning MiRTA PBX has no knowledge of the various brands or models, but offers a generic framework to create a template and use some variables. Some variables are already stored in the system, but more can be added easily. Provisioning is made over HTTP and HTTPS. Obviously it is preferable to provision over HTTPS to avoid having SIP credentials to travel in clear over the Internet. Some brand of phones are quite picky about the certificate authority used for the SSL, so in case of problems, it can be good to make a test using HTTP or check the phone configuration about third party CA.
Some phone templates are provided as proof of concept, but they are not supposed to be neither complete neither accurate.
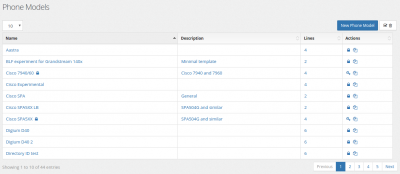
Phone Models
Several phone models can be defined. For each phone model the number of lines needs to be defined, usually with the starting and ending line number. Please refer to the phone's provisioning guide to customize or create new templates.

A phone template can be "locked" to prevent any accidental modification. You can easily duplicate a provisioning template using the action icon on the right
For each phone you can define a generic name, an option description, the first and last account number, the mac request template, the directory request template, the remote provisioning POST message along with the credentials to use for remote provisioning. Remote provisioning is the ability of some manufacturer to deliver a phone configuration just out of the box, like Yealink RPS and Polycom ZTP.
The template may contain variables in the general format ${name|default|type|options}.
So for example you can define the default value for the server_host variable, like:
{$server_host|demo.mirtapbx.com}To help users in configuring their system, you can specify the editing box type, so if by default is a text type as in:
{$server_host}
You can use a select box as in:
{$vpk1type|0|select|Disabled=-1,Line=0,BLF=11,SpeedDial=4}
Or you can use a radio button as in
{$screensaver|0|radio|Disabled=0,Enabled=1}
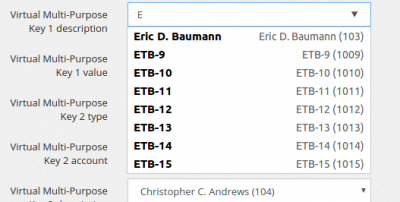
Or you can use an editable select box as in
{$vpk1description||editableselect|pickupname}
You can replace the options with three different macros:
- pickupextension (for picking up the extension username)
- pickupnumber (for picking up the extension number)
- pickupname (for picking up the extension name)
like
{$vpk1value||select|pickupextension}
They will be expanded to the list of extensions defined in the tenant.
Some variables are predefined and are read directly from the system configuration:
- line_active – Always 1
- displayname – Name of the Extension assigned
- virtualdisplayname – Name of the Virtual Extension assigned
- username – SIP username
- authname - SIP username
- number – Number of the Extension assigned
- virtualnumber – Number of the Virtual Extension assigned
- secret – Password of the Extension assigned
- index - The position of the account starting from the first line defined
- tenantcode - The account code for tenant
- subscribemwi - The option configured for "Send MWI only if subscribed"
- mailbox - The mailbox associated to the extension
- transport - The transport used for the extension (asterisk notation: udp, tcp and tls)
- transportY - The transport used for the extension (Yealink notation: 0 for udp, 1 for tcp and 2 for tls)
- transportP - The transport used for the extension (Polycom notation: UDPOnly for udp, TCPOnly for tcp and TLS for tls)
- codecs - The codecs configured for the extension (asterisk notation)
- line – Order position of the line (usually 1, 2, 3, etc)
- line_m1 - Order position of the line (usually 1, 2, 3, etc)
- key - Order position of the line (usually 1, 2, 3, etc)
- index - Order position of the line, always starting by 1
- mac – Mac Address of the phone, without :
- provisionpassword – Password for provisioning URL
It is possible to define loops in the template using the {line_loop} and {/line_loop} keywords. Each variable used needs to be defined in the “Variables” menu. In case a variable is not defined, an alert message will be shown.
Phone Directory (Phone Books)
it is possible to create a template also for provisioning the directory on the phone, pushing one (or more) phone books data to the phone. The phone book template needs to use an {item_loop} keyboard and it is returned to the phone when it asks for one of the following files:
- MAC-directory.xml
- MACphonebook.xml
- (more file name types can be added)
This is an example phone directory template:
<?xml version="1.0" encoding="UTF-8" standalone="yes"?>
<!-- $Revision: 1.2 $  $Date: 2004/12/21 18:28:05 $ -->
<directory>
        <item_list>
                {item_loop}
                <item>
                        <ln>{$LASTNAME}</ln>
                        <fn>{$FIRSTNAME}</fn>
                        <ct>{$PHONE1}</ct>
                        <sd></sd>
                        <lb>{$NAME}</lb>
                        <rt></rt>
                        <dc></dc>
                        <ad></ad>
                        <ar></ar>
                        <bw></bw>
                        <bb></bb>
                </item>
                {/item_loop}
        </item_list>
</directory>
You can use the following variables:
- NAME
- FIRSTNAME
- LASTNAME
- COMPANY
- PHONE1
- PHONE2
- PHONE3
- PHONE4
- PHONE5
- PHONE6
- PHONE7
- SIPADDRESS
- XMPPADDRESS
- ACCOUNTNUMBER
- FAX
You can add more variables to use editing the table pi_phonebookitems and then enabling them in your phone book
Button layouts
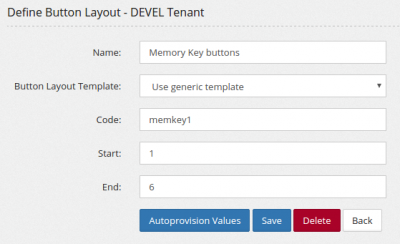
It is possible to create special loops for defining button layouts. A button layout needs to be defined in the Configuration/Provisioning/Button Layouts and then referenced in the template.
In this case a memory key with code "memkey1" has been created to match the {loop_memkey1} defined in the template
{loop_memkey1}
memorykey.{$key}.type = {$type}
memorykey.{$key}.line = {$account}
memorykey.{$key}.value = {$extension}
memorykey.{$key}.pickup_value = {$parameter}
{/loop_memkey1}
For each button layout there are some variables you can use:
- type
- account
- extension
- label
- parameter
You are free to use any of these variables to match your phone provisioning structure or add new variables in Admin/Provisioning/Variables
Using a Button Layout template
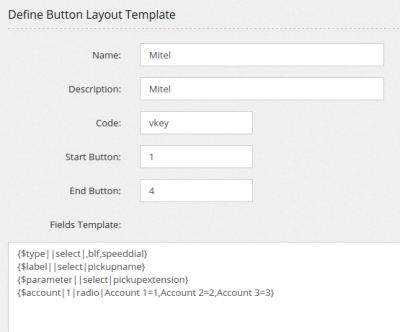
A button layout template is a way to make it easier for the user to fill the values needed to define the button layout autoprovision values
Only the variables referenced in the template will be used (but the order is the one defined by the autoprovision variable order) and their editing can be customized using the controls already described in the phone template


