Installing MiRTA PBX: Difference between revisions
No edit summary |
No edit summary |
||
| Line 116: | Line 116: | ||
Proceed on the web interface and login using admin/nabucco347 credentials. | Proceed on the web interface and login using admin/nabucco347 credentials. | ||
Fill the Admin/Settings page with the International Prefix, Trunk Prefix, License Key, Voipmedia retention and Call History days. I suggest also to select the Show Status of Extensions, Admins see all tenants and choose at least a format for DID selection. | |||
Save the configuration. | |||
Press on the Upgrade button to upgrade top latest version. | |||
Log out from the web interface and log in again to apply the database upgrade. | |||
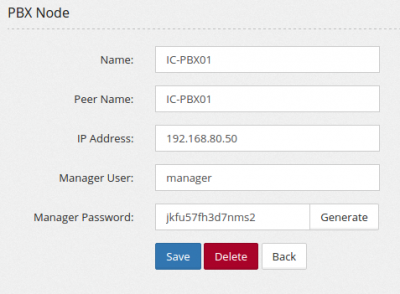
Move to Admin/PBX Nodes and Add a new node. The most important one is the Peer Name. It needs to match the "uname -n" from the OS. | |||
[[File:setupnewnode.png|400px]] | |||
Revision as of 10:02, 4 August 2016
Installing MiRTA PBX is not a piece of cake and the automatic installer has been proven only on CentOS 6 64bit. Even with the automatic installer, a series of manual steps are required.
- Copy the installer script from pbx/protected/installMirtaPBX.sh to /usr/local/src in your new server
- Move to /usr/local/src
- Edit it and check the version, set to 6
- Check your hostname, change to something more useful if you have set to localhost
- Upgrade the Kernel by running
./installMirtaPBX.sh Kernel
- Reboot the server to be sure to have the latest kernel running
- Move again to /usr/local/src
- Install the system by running
./installMirtaPBX.sh
If there will be no errors, you'll have asterisk and voipmonitor compiled and installed.
Proceed in checking if SELinux is active and disable it
# getenforce
Enforcing
# setenforce 0
# getenforce
Permissive
Move in /var/www/html/pbx and start by configuring include/db.inc.php copying from include/db.inc.php.sample
# cd /var/www/html/pbx
# cp include/db.inc.php.sample include/db.inc.php
Edit the include/db.inc.php and fill in with the mtpbxname and mtpbxkey values provided
Upgrade the database to the basic version:
# php dodbupgrade.php
There will be some errors and notice, just ignore them. Now convert the database to UTF8.
# cd protected
# php convert_to_utf8.php
Now it is time to setup the timezone on php. Try running the checkupgrade.php utility
# cd /var/www/html/pbx
# php checkupgrade.php
If you see an error like:
PHP Warning: strtotime(): It is not safe to rely on the system's timezone settings. You are *required* to use the date.timezone setting or the date_default_timezone_set() function. In case you used any of those methods and you are still getting this warning, you most likely misspelled the timezone identifier. We selected the timezone 'UTC' for now, but please set date.timezone to select your timezone. in /var/www/html/pbx/checkupgrade.php on line 19
It means you need to carefully select the timezone in php.ini, like
[Date]
; Defines the default timezone used by the date functions
; http://www.php.net/manual/en/datetime.configuration.php#ini.date.timezone
date.timezone = Australia/Sydney
Now move to /etc/asterisk and edit sip.conf and manager.conf setting up the entry for the server itself, replacing srv01 with your server short name
[IC-PBX01]
context=fromotherpbx
type=friend
defaultuser=IC-PBX01
secret=j47fgh3d56g238rk20s
host=192.168.80.50
qualify=yes
insecure=port,invite
If the server is on private IP, then you need to identify the public IP and add in the [general] section:
externip=103.161.91.22
localnet=192.168.80.0/24
Once set sip.conf, proceed in reloading and verify if the server itself is reachable
# asterisk -rx 'sip reload'
# asterisk -rx 'sip show peers'
Name/username             Host                                    Dyn Forcerport Comedia    ACL Port     Status      Description                      Realtime
IC-PBX01/IC-PBX01         192.168.80.50                               Auto (No)  No             5060     OK (1 ms)
Add the local IP address to manager.conf
[manager]
secret=jkfu57fh3d7nms2
deny=0.0.0.0/0.0.0.0
permit=127.0.0.1/255.255.255.255
permit=192.168.80.50/255.255.255.255
read=system,call,log,verbose,agent,user,config,dtmf,reporting,cdr,dialplan
write=system,call,agent,user,config,command,reporting,originate
Reload the manager interface
# asterisk -rx 'manager reload'
Now move to /var/lib/asterisk/agi-bin and apply the same configuration change about include/db.inc.php
Edit devstate.conf.php (copying from devstate.conf.php.sample) and list the IP address for the servers belonging to the cluster
$server=array('192.168.80.50');
Proceed on the web interface and login using admin/nabucco347 credentials.
Fill the Admin/Settings page with the International Prefix, Trunk Prefix, License Key, Voipmedia retention and Call History days. I suggest also to select the Show Status of Extensions, Admins see all tenants and choose at least a format for DID selection.
Save the configuration.
Press on the Upgrade button to upgrade top latest version.
Log out from the web interface and log in again to apply the database upgrade.
Move to Admin/PBX Nodes and Add a new node. The most important one is the Peer Name. It needs to match the "uname -n" from the OS.
