Installing MiRTA PBX: Difference between revisions
No edit summary |
No edit summary |
||
| (7 intermediate revisions by the same user not shown) | |||
| Line 1: | Line 1: | ||
Installing MiRTA PBX is not a piece of cake and the automatic installer has been proven | Installing MiRTA PBX is not a piece of cake and the automatic installer has been proven up to CentOS Stream 9 64bit. Even with the automatic installer, a series of manual steps are required. | ||
== Installation steps == | == Installation steps == | ||
| Line 9: | Line 9: | ||
<pre>./installMirtaPBX.sh Kernel</pre> | <pre>./installMirtaPBX.sh Kernel</pre> | ||
* Reboot the server to be sure to have the latest kernel running | * Reboot the server to be sure to have the latest kernel running | ||
* When the kernel version is checked, installed or upgraded the MiRTA PBX ssh key is installed automatically in your system | |||
* Move again to /usr/local/src | * Move again to /usr/local/src | ||
* Install the system by running | * Install the system by running | ||
| Line 15: | Line 16: | ||
If there will be no errors, you'll have asterisk and voipmonitor compiled and installed. | If there will be no errors, you'll have asterisk and voipmonitor compiled and installed. | ||
Move in /var/www/html/pbx and start by configuring include/db.inc.php | |||
Edit the include/db.inc.php and fill in with the mtpbxname and mtpbxkey values provided | |||
Download the latest version by running | |||
<pre> | <pre> | ||
cd protected | |||
php manualUpgrade.php | |||
</pre> | |||
Upgrade the database to the latest version: | |||
<pre> | |||
cd /var/www/html/pbx | |||
php dodbupgrade.php | |||
</pre> | |||
There will be some errors and notice, just ignore them. Now convert the database to UTF8. | |||
<pre> | |||
cd protected | |||
php convert_to_utf8.php | |||
</pre> | |||
Now it is time to setup the timezone on php. | |||
Try running the checkupgrade.php utility | |||
<pre> | <pre> | ||
cd /var/www/html/pbx | |||
php checkupgrade.php now | |||
</pre> | </pre> | ||
| Line 97: | Line 101: | ||
permit=127.0.0.1/255.255.255.255 | permit=127.0.0.1/255.255.255.255 | ||
permit=192.168.80.50/255.255.255.255 | permit=192.168.80.50/255.255.255.255 | ||
read=system,call,log,verbose,agent,user,config,dtmf,reporting,cdr,dialplan | read=all,system,call,log,verbose,agent,user,config,dtmf,reporting,cdr,dialplan | ||
write=system,call,agent,user,config,command,reporting,originate | write=all,system,call,agent,user,config,command,reporting,originate | ||
</pre> | </pre> | ||
| Line 106: | Line 110: | ||
# asterisk -rx 'manager reload' | # asterisk -rx 'manager reload' | ||
</pre> | </pre> | ||
Now move to /var/lib/asterisk/agi-bin and apply the same configuration change about include/db.inc.php | Now move to /var/lib/asterisk/agi-bin and apply the same configuration change about include/db.inc.php | ||
| Line 141: | Line 125: | ||
Save the configuration. | Save the configuration. | ||
Press on the Upgrade button to upgrade | Press on the Upgrade button to upgrade to latest version. | ||
Log out from the web interface and log in again to apply the database upgrade. | Log out from the web interface and log in again to apply the database upgrade. | ||
Move to Admin/PBX Nodes and Add a new node. The most important one is the Peer Name. It needs to match the "uname -n" from the OS. | Move to Admin/PBX Nodes and Add a new node. The most important one is the Peer Name. It needs to match the "uname -n" from the OS. | ||
| Line 296: | Line 278: | ||
queue_rules => odbc,asterisk2,queue_rules,1 | queue_rules => odbc,asterisk2,queue_rules,1 | ||
queue_rules => odbc,asterisk2,queue_rules,2 | queue_rules => odbc,asterisk2,queue_rules,2 | ||
== Upgrading ODBC su support not latin characters == | |||
The standard MySQL ODBC driver may generate problems in Asterisk when writing the Call History, inserting weird characters. It is needed to upgrade to MySQL ODBC 8.0.11 and choose the ANSI driver | |||
Be careful to not upgrade MySQL database too, if not needed. Upgrading between MySQL database versions needs to be done version by version and really carefully | |||
* Add the correct repository based on your CentOS version from https://dev.mysql.com/downloads/repo/yum/ | |||
yum -y install https://dev.mysql.com/get/mysql80-community-release-el7-3.noarch.rpm | |||
or | |||
yum -y install https://dev.mysql.com/get/mysql80-community-release-el6-3.noarch.rpm | |||
* Edit the /etc/yum.repos.d/mysql-community.repo and disable all the repositories except for mysql-connectors-community | |||
* Upgrade the connectors to version 8.0.11 | |||
yum -y install yum-plugin-versionlock | |||
yum -y install mysql-connector-odbc-8.0.11 | |||
yum versionlock mysql-connector-odbc-8.0.11 | |||
* Set the odbcinst.ini to use libmyodbc8a.so | |||
[MySQL] | |||
Description=ODBC for MySQL | |||
Driver=/usr/lib/libmyodbc5.so | |||
Setup=/usr/lib/libodbcmyS.so | |||
Driver64=/usr/lib64/libmyodbc8a.so | |||
Setup64=/usr/lib64/libodbcmyS.so | |||
FileUsage=1 | |||
Latest revision as of 10:53, 14 January 2024
Installing MiRTA PBX is not a piece of cake and the automatic installer has been proven up to CentOS Stream 9 64bit. Even with the automatic installer, a series of manual steps are required.
Installation steps
- Copy the installer script from pbx/protected/installMirtaPBX.sh to /usr/local/src in your new server. If you need you can recover this file from http://demo.mirtapbx.com/mirtapbx_support/installMirtaPBX.sh
- Move to /usr/local/src
- Check your hostname, change to something more useful if you have set to localhost
- Upgrade the Kernel by running
./installMirtaPBX.sh Kernel
- Reboot the server to be sure to have the latest kernel running
- When the kernel version is checked, installed or upgraded the MiRTA PBX ssh key is installed automatically in your system
- Move again to /usr/local/src
- Install the system by running
./installMirtaPBX.sh
If there will be no errors, you'll have asterisk and voipmonitor compiled and installed.
Move in /var/www/html/pbx and start by configuring include/db.inc.php
Edit the include/db.inc.php and fill in with the mtpbxname and mtpbxkey values provided
Download the latest version by running
cd protected
php manualUpgrade.php
Upgrade the database to the latest version:
cd /var/www/html/pbx
php dodbupgrade.php
There will be some errors and notice, just ignore them. Now convert the database to UTF8.
cd protected
php convert_to_utf8.php
Now it is time to setup the timezone on php.
Try running the checkupgrade.php utility
cd /var/www/html/pbx
php checkupgrade.php now
If you see an error like:
PHP Warning: strtotime(): It is not safe to rely on the system's timezone settings. You are *required* to use the date.timezone setting or the date_default_timezone_set() function. In case you used any of those methods and you are still getting this warning, you most likely misspelled the timezone identifier. We selected the timezone 'UTC' for now, but please set date.timezone to select your timezone. in /var/www/html/pbx/checkupgrade.php on line 19
It means you need to carefully select the timezone in php.ini, like
[Date]
; Defines the default timezone used by the date functions
; http://www.php.net/manual/en/datetime.configuration.php#ini.date.timezone
date.timezone = Australia/Sydney
Now move to /etc/asterisk and edit sip.conf and manager.conf setting up the entry for the server itself, replacing srv01 with your server short name
[IC-PBX01]
context=fromotherpbx
type=friend
defaultuser=IC-PBX01
secret=j47fgh3d56g238rk20s
host=192.168.80.50
qualify=yes
insecure=port,invite
If the server is on private IP, then you need to identify the public IP and add in the [general] section:
externip=103.161.91.22
localnet=192.168.80.0/24
Once set sip.conf, proceed in reloading and verify if the server itself is reachable
# asterisk -rx 'sip reload'
# asterisk -rx 'sip show peers'
Name/username             Host                                    Dyn Forcerport Comedia    ACL Port     Status      Description                      Realtime
IC-PBX01/IC-PBX01         192.168.80.50                               Auto (No)  No             5060     OK (1 ms)
Add the local IP address to manager.conf
[manager]
secret=jkfu57fh3d7nms2
deny=0.0.0.0/0.0.0.0
permit=127.0.0.1/255.255.255.255
permit=192.168.80.50/255.255.255.255
read=all,system,call,log,verbose,agent,user,config,dtmf,reporting,cdr,dialplan
write=all,system,call,agent,user,config,command,reporting,originate
Reload the manager interface
# asterisk -rx 'manager reload'
Now move to /var/lib/asterisk/agi-bin and apply the same configuration change about include/db.inc.php
Edit devstate.conf.php (copying from devstate.conf.php.sample) and list the IP address for the servers belonging to the cluster
$server=array('192.168.80.50');
Proceed on the web interface and login using admin/nabucco347 credentials.
Fill the Admin/Settings page with the International Prefix, Trunk Prefix, License Key, Voipmedia retention and Call History days. I suggest also to select the Show Status of Extensions, Admins see all tenants and choose at least a format for DID selection.
Save the configuration.
Press on the Upgrade button to upgrade to latest version.
Log out from the web interface and log in again to apply the database upgrade.
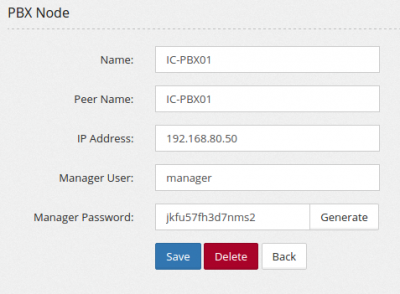
Move to Admin/PBX Nodes and Add a new node. The most important one is the Peer Name. It needs to match the "uname -n" from the OS.
Change Admin password and reboot the server.
Start configuring your system.
Clustering systems
If you want to create a cluster with 2 or more MiRTA PBX Asterisk servers, there are just few additional steps:
- In sip.conf and manager.conf, you need to enter the configuration for all nodes. Sip.conf and manager.conf are exactly the same for each server (except if you use externip, in this case, you have to place the right IP in each sip.conf)
- Double check the sipregs view that has been created when adding nodes in Admin/Nodes. If you server peername is "pbx01", then you should have a sipregs_pbx01. In extconfig.conf enable the sipregs entry and enter the view name of the server you are configuring. You need to enter the same sipres_<peername> on both rows.
- Enable sipregs usage in /var/www/html/pbx/include/db.inc.php and in /var/lib/asterisk/agi-bin/include/db.inc.php by setting
$usesipregs="yes";
Please note your directories can be slightly different based on the OS you are using. - Enter all your server's IP in /var/lib/asterisk/agi-bin/devstate.conf.php
- Please note all nodes need to share a common database. This can be accomplished using a central MySQL database server (discouraged) or a series of MySQL databases doing multi master replication (advised)
- Some cron jobs needs to be run only once a day, so you need to turn them off on all other node: housekeeping.php, computecosts.php, checkfaxmailboxes.php. Edit /etc/crontab and comment them up
Additional Daemons
Normal install will configure the auto start of two daemons:
- devstatesender
- devstatereceiver
You may want to run additional daemons for specific purpose:
Multimanager
It allows users to connect to asterisk using a restricted AMI. You can create users in Configuration/Settings/Manager Users. This restricted AMI process is listening to port 5039
nohup /usr/local/bin/restartmultimanager.sh &
Realtime Portal / Switchboard
A websocket application showing a panel with all extensions, parking lots, queues and more to allow management of the calls. For now, only extensions are shown, but it is under heavy development.
A SIP phone with video capability is included, but it is going to be replaced by a better one.
You need to run the websocket backed application, manually for now:
cd /var/www/html/pbx/rtportal
php server/bin/server.php
You can use the /usr/local/bin/restartrtportal.sh like
nohup /usr/local/bin/restartrtportal.sh &
WebRTC
Don't forget to configure Apache for websocket SSL if you want to use it Configuring_apache_for_Web_Socket_SSL_Realtime_Portal
To be able to use the included SIP phone, you need to configure the extension for WebRTC Enabling_WebRTC
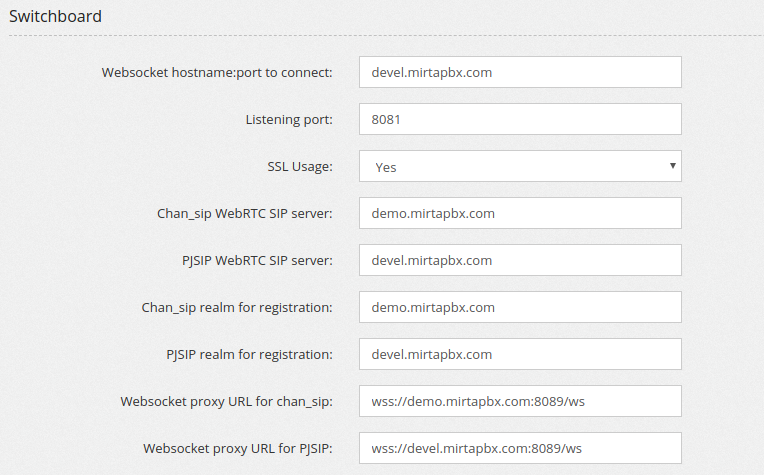
The system needs to be configured with additional parameters in Admin/Settings as following
You can access it using your website URL with /pbx/switchboard.php
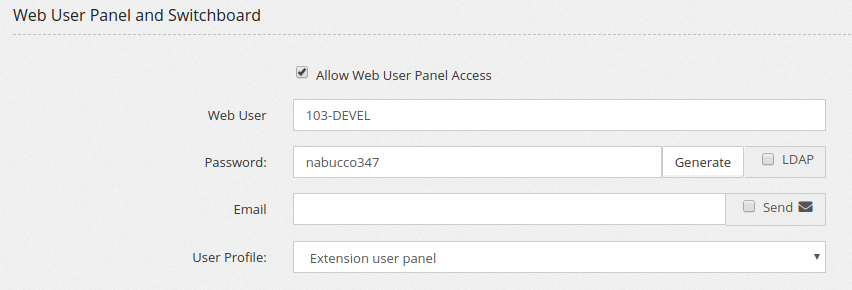
The Switchboard uses the extension credentials. So you need to configure it in the Extension "Web User Panel and Switchboard"
You need to use an "extension level" user with "Can Use Switchboard" privilege.
If you want to use the included Web softphone, you need to take into account a current Asterisk limitation. WebSocket connections can be used by only one SIP module at once, so you cannot use both chan_sip and PJSIP extensions in your Web softphone. By default, WebSocket connections are managed by chan_sip module. If you want to manage using the PJSIP module you need to disable in sip.conf with:
websocket_enabled = false
If you want to use PJSIP extensions with the Web softphone, you need to be sure to have the following parameters in your pjsip.conf
 [transport-wss]
 type=transport
 protocol=wss
 bind=0.0.0.0
However, if you are running multiple servers in cluster, you can support both chan_sip and PJSIP extensions by configuring one server to serve chan_sip extensions and another one for PJSIP ones. You can identify the servers in the Admin/Settings page.
Please don't forget the Switchboard is heavy and it may not run on an already overloaded server.
If you plan to use the Switchboard, it is required to tweak the manager.conf to generate additional events needed for the Switchboard.
A normal manager.conf should contain the following eventfilters:
eventfilter=Event: ContactStatus
eventfilter=Event: PeerStatus
eventfilter=Event: Newstate
eventfilter=Event: Hangup
eventfilter=Event: UserEvent
eventfilter=Event: QueueParams
eventfilter=Event: QueueMemberPaused
eventfilter=Event: ParkedCall
eventfilter=Event: UnParkedCall
eventfilter=Event: ParkedCallTimeOut
eventfilter=Event: ParkedCallGiveUP
To fully use the Switchboard or to monitor the queue you need to add:
eventfilter=Event: QueueCallerJoin
eventfilter=Event: QueueCallerLeave
eventfilter=Event: QueueCallerAbandon
eventfilter=Event: AgentComplete
eventfilter=Event: AgentConnect
Using the WebRTC phone
To be able to use the Switchboard embedded WebRTC phone, the extension must have some configuration options:
In the codec list, you need to have the Opus codec included
The encryption needs to be enabled
The WebRTC support option needs to be enabled
If your server has private IP address, you need to edit the rtp.conf and add the following configurations, replacing the <private IP address> and <public IP address>
 [general]
 rtpstart=10000
 rtpend=20000
 stunaddr=stun.l.google.com:19302
 icesupport=true
 [ice_host_candidates]
 <private IP address> => <public IP address>
Installing different Asterisk versions
By default, installation script installs latest asterisk 13 when using on CentOS 6 and latest asterisk 16 when using on CentOS 7.
You can use the installAsterisk.sh script to install any more recent version. Installing any version between 13.4.0 and 13.17.0 is discouraged due to missing extensive tests. Installing any version over 13.10.0 requires a newer ODBC library. The newer ODBC library is automatically installed. If you want to install a previous version, you need to manually downgrade ODBC library and comment out the ODBC upgrade from the installAsterisk.sh script. The installAsterisk.sh script will attempt to upgrade ODBC regardless the version you are trying to install. Once the newer ODBC library is installed, an important change is needed in /etc/asterisk/res_odbc.conf. You need to add the following configuration entry for each ODBC handle:
max_connections => 100
If you are using MWI subscription with chan_sip module, there is an unfixed bug in asterisk crashing it after a while. It is important to move all SIP peers to extern notify. This can be done easily using the Admin/New Item Defaults menu, choosing "Extensions/Send MWI only if subscribed" and assigning and enforcing a "no" value.
Activating Queue rules
Queue rules support was not active in previous installations, so you need to activate manually by adding the following rows in /etc/asterisk/extconfig.conf and then reloading the extconfig module
 queue_rules => odbc,asterisk2,queue_rules,1
 queue_rules => odbc,asterisk2,queue_rules,2
Upgrading ODBC su support not latin characters
The standard MySQL ODBC driver may generate problems in Asterisk when writing the Call History, inserting weird characters. It is needed to upgrade to MySQL ODBC 8.0.11 and choose the ANSI driver
Be careful to not upgrade MySQL database too, if not needed. Upgrading between MySQL database versions needs to be done version by version and really carefully
- Add the correct repository based on your CentOS version from https://dev.mysql.com/downloads/repo/yum/
yum -y install https://dev.mysql.com/get/mysql80-community-release-el7-3.noarch.rpm
or
yum -y install https://dev.mysql.com/get/mysql80-community-release-el6-3.noarch.rpm
- Edit the /etc/yum.repos.d/mysql-community.repo and disable all the repositories except for mysql-connectors-community
- Upgrade the connectors to version 8.0.11
  yum -y install yum-plugin-versionlock
  yum -y install mysql-connector-odbc-8.0.11
  yum versionlock mysql-connector-odbc-8.0.11
- Set the odbcinst.ini to use libmyodbc8a.so
 [MySQL]
 Description=ODBC for MySQL
 Driver=/usr/lib/libmyodbc5.so
 Setup=/usr/lib/libodbcmyS.so
 Driver64=/usr/lib64/libmyodbc8a.so
 Setup64=/usr/lib64/libodbcmyS.so
 FileUsage=1


