Themes: Difference between revisions
| Line 70: | Line 70: | ||
* Add an entry for apachectl in /etc/sudoers.d/apache like <pre>apache ALL = NOPASSWD: /usr/sbin/apachectl</pre> | * Add an entry for apachectl in /etc/sudoers.d/apache like <pre>apache ALL = NOPASSWD: /usr/sbin/apachectl</pre> | ||
* | * Restart your Apache web server | ||
== Let's Encrypt integration == | == Let's Encrypt integration == | ||
Revision as of 15:58, 16 December 2017
The "Themes" section allows to manage different themes for your website. Each theme is identified by the URL used to access it. The default theme has a regular expression to "catch all" URL used: ^.* If you want to use different themes for your multiple website hosted on MiRTA PBX, you need to remove this entry and populate with the specific URL.
When the website will be accessed, using one of the listed URL, the selected theme will be used.
You can use any Regular Expression to identify your URL.
When defining a Theme, you can choose several options and even produce a complete new CSS theme.
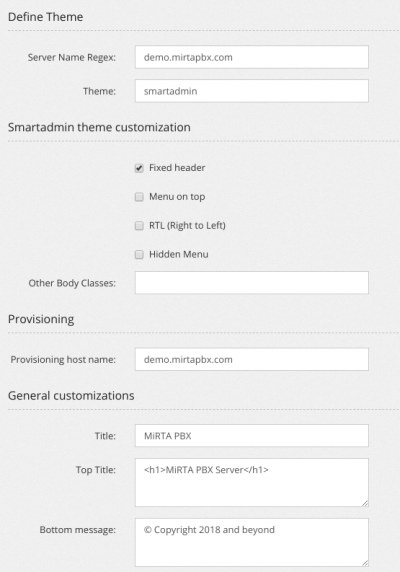
Server Name Regex allows to define the regular expression to capture the URL used to access the website. So you can have a theme for www.yourvoipcompany.com and one for www.yourpbx.com with different colors, settings and text
Theme is the directory where to get all the files for the theme
Fixed header specified if the top header will stay in place when scrolling the page or not
Menu on top allows to have menu on top instead of the left side
RTL (Right to Left) is for the countries using RTL languages
Hidden menu hides the main menu but still accessable by hovering over left edge
Other Body Classes permits to use your own full body classes or one of the SmartAdmin skins, like from smart-style-1 to smart-style-4
Title is the window title that will be used
Top Title is the title on the top of the page, with HTML formatting
Bottom Message is the message shown at the bottom of every page
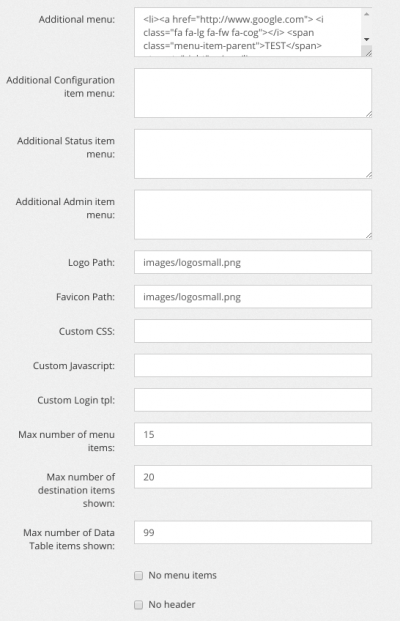
Logo path is the local path where to find an image to show on first page and on every page, in the top left corner
Favicon path is the local path where to find a .ico image to use as favicon.
Custom CSS allows to use an additional CSS. The file needs to be placed inside the theme directory as following: themes/{$theme}/css/{$customcss}
Custom Javascript allows to use an additional Javascript. The file needs to be placed inside the theme directory as following: themes/{$theme}/js/{$customjs}
Custom Login.tpl allows you to define a completely rewritten login.tpl page. You can download the original login.tpl file from http://demo.mirtapbx.com/mirtapbx_support/login.tpl
Max number of menu items defines how many menu items to show max. The additional menu items will be shown in an "More Configuration" menu item
Max number of destination items shown defines how many menu items to show when selecting the destination for an object. More items can be recovered pressing the "More..." link or using the search box.
Max number of Data Table items shown defines how many menu items to show using the Data Table javascript control. If more items are available, then the jqGrid will be automatically used. You can use either one pressing the double arrow, when available (Extensions and DIDs pages only).
Login page allows to define the messages for the standard login.tpl page
Multiple clusters portal permit to activate a special feature, when having multiple distinct MiRTA PBX clusters, allowing to use the login page of a server to access any of the clusters. This is named Multiple Cluster Portal
Apache integration
You can automatically create the Apache configuration files from the Themes page. To be able to use this feature, you need to make some adjustment to the server:
- Configure your Apache web server to use Virtual Hosts, check these lines are in /etc/httpd/conf/httpd.conf
NameVirtualHost *:80
NameVirtualHost *:443
- Configure in Admin/Settings the "Virtual Host directory" and "Virtual Host template". For each of the theme entered, you can create the Apache configuration file
- If you are running multiple servers and you like to automatically distribute the Apache configuration files among multiple servers, you need to copy the protected/alignConfiguration.sh in /usr/local/bin, edit as needed and add a suoders entry for this file in /etc/sudoers.d/apache
apache ALL = NOPASSWD: /usr/local/bin/alignConfiguration.sh
- Add an entry for apachectl in /etc/sudoers.d/apache like
apache ALL = NOPASSWD: /usr/sbin/apachectl
- Restart your Apache web server
Let's Encrypt integration
To be able to use Let's Encrypt service, you need to install and configure certbot following https://certbot.eff.org/ instructions and then:
- Rename /etc/httpd/conf.d/ssl.conf in /etc/httpd/conf.d/00_ssl.conf to be sure it is read first
- Copy or link certbot-auto in /usr/local/bin
- Add an entry for apachectl in /etc/sudoers.d/apache like
apache ALL = NOPASSWD: /usr/sbin/apachectl
- Add an entry for certbot-auto in /etc/sudoers.d/apache like
apache ALL = NOPASSWD: /usr/local/bin/certbot-auto
- If you are running multiple servers and you like to automatically distribute the Let's Encrypt certificatesand configuration files among multiple servers, you need to copy the protected/alignConfiguration.sh in /usr/local/bin, edit as needed and add a suoders entry for this file in /etc/sudoers.d/apache
apache ALL = NOPASSWD: /usr/local/bin/alignConfiguration.sh
- restart your Apache web server


